How to Prepare your Model Car for Painting
Painting miniature models is a great pastime – it’s relaxing and allow you to switch off from the week’s work. But it can be quite frustrating when you are not quite getting the perfect finish you hoped for.
There are some steps you can take which should help prevent these imperfections from happening and make sure that the model car paint colours are an accurate representation of the real thing.
Choose quality products and colours
It is really important to have the right equipment. That means makes sure you do some research, or speak to other model painting enthusiasts for advice and guidance if needed. If you are currently hand painting you may want to consider switching to an airbrush as there is no better way to get a smooth, blemish free finish. A specialised airbrush will also need the right paints and primer.
Depending on the colour, you will need either a dark grey or off white colour primer to go under the paint colours. When choosing the colours themselves, opt for a solvent based lacquer, like you can get from Gravity Colors. You’ll want the pre-thinned variety if you are using an airbrush, and the best option is usually quick drying so that there is less opportunity for imperfections to occur. Buying quality paint will ensure less fading over time, and good even coverage. Metallic paints should have metal flakes that are to scale, or the final result will not look quite right.
Once you have all the right equipment, and some protective goggles and a mask for safety, then give the equipment a try first to get used to how it all operates. Especially if you are new to airbrushing and need to understand how the spray feels and distributes.
Do your work in a dust free area
It is vital to make sure your workspace is clean, tidy and dust free when working with paint. If dust is disturbed when the paint or primer is still wet it can complete ruin the finish.
You need to give the model itself a very good clean too. If there is grease or dust on the model this will also cause issues when applying the paint. Soapy water should do the trick, but be sure to dry it all properly after cleaning. You should be ready to start painting now.
Get ready to start painting
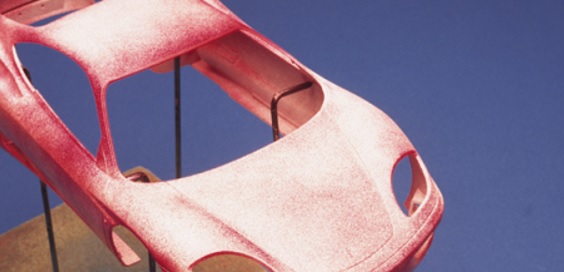
To avoid accidentally ruining the finish, set the model on a stand so you can move easily around it and cover the whole model without handling it.
Apply the primer as per the instructions, it will need a few thin layers. Primer will give a good base for the paint and also smooth out any microscopic scratches in the model. You’ll need to clean the airbrush thoroughly before you move to the colour paint. Using acetone should clean it properly. Allow the model to dry completely before applying colour.
Colour is also best applied in thin coats, rotating the stand carefully. The consistency of the paint at first should be like a fine mist, before thickening the coats a little towards the final couple of coats. Watch out though, thicker spray is more prone to running which you do not want to happen. This stage could take up to 48 hours to dry, but once that has happened you can hand paint in any smaller details.
It won’t yet have a high gloss finish, for this you will need to add one final clear coating, which will allow a high shine, and protect the paint layers.
Simply add the final stickers and your model is complete. The quality of the end result will make all the care and attention well worth it.